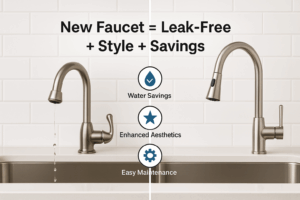
Upgrading a kitchen sink faucet enhances your home’s efficiency, appearance, and plumbing performance. This expert guide covers why and when to upgrade, how to choose the right faucet, tools required, and a step-by-step installation process. Learn how to prevent leaks, improve water flow, and ensure proper maintenance. Ideal for DIYers and homeowners in Oakville, this guide also explains when to contact a professional plumber and where to find emergency plumbing support. Includes internal links for local plumbing services and faucet-specific care tips.
Upgrading your kitchen sink faucet can enhance both aesthetics and efficiency. Whether you’re installing a new fixture to match your modern décor or simply looking to eliminate leaks, this guide provides plumber-approved insights and step‑by‑step guidance to get the job done right
Why Upgrade Your Kitchen Faucet?
Upgrading your sink faucet isn’t just an aesthetic choice—it brings practical benefits:
- Improved functionality: Modern faucets offer features like touchless activation, pull-down sprayers, and water-saving aerators.
- Leak elimination: A new valve cartridge or seals stop dripping and save water bills.
- Water efficiency: Low-flow and aerated designs meet ENERGY STAR standards.
- Enhanced curb appeal: Faucets in premium finishes (brushed nickel, black matte) elevate your kitchen’s look.
- Simplified maintenance: New models are easier to clean and replace parts.
Preparing the Upgrade Project
1 Measure and Choose the Right Faucet
- Hole count: Standard sinks are 3-hole (1″ diameter each); optional add-on: soap dispenser.
- Spout reach and height: Confirm clearance over sink basin to avoid splashing.
- Mounting style: Deck-mount vs. wall-mount—your counter and backsplash will determine the type.
2 Water Supply & Shut-Off
- Locate the shut-off valves under the sink. Turn both hot and cold valves clockwise until tight.
- Open faucet spout to release residual pressure before work.
3 Budget & Sourcing
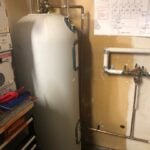
- Decide between DIY or hiring a pro. If you’re in Oakville or surrounding regions, consider reliable options like our Oakville plumbers.
- For unexpected issues like corroded pipes or sealing problems, our 24-hour emergency plumbing services are available.
Tools & Materials You’ll Need
- New kitchen faucet with components (hoses, escutcheon plate)
- Adjustable wrench and basin wrench
- Plumber’s putty or silicone caulk
- Teflon plumber’s tape
- Bucket, rags, flashlight
- Pipe-cleaning brush or steel wool for corrosion
- Optional: water filter kit if desired
Step‑by‑Step Installation Guide
1 Remove the Old Faucet
- Place a bucket and towels under the sink.
- Shut off water supply and open the faucet to verify flow stops.
- Use an adjustable or basin wrench to disconnect flexible hoses and mounting nuts.
- Remove the old faucet and clean mounting surface thoroughly.
2 Inspect and Prepare the Surface
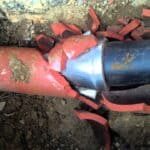
- Check the old water supply hoses and shut-off valves for wear or corrosion—replace if necessary.
- Clean the mounting area, removing adhesive or debris for a tight seal.
3 Install the New Faucet
- Apply plumber’s putty or silicone caulk around the sink hole.
- Thread the faucet assembly into place through the counter or sink.
- From underneath, secure faucet with mounting nuts.
- Tighten hoses into faucet and shut-off valves; wrap valve threads with Teflon tape for leak protection.
- Wipe away excess caulk.
4 Connect Accessories & Extensions
- Add pull-down sprayer hose, soap dispenser, or filtered water line.
- Tighten all connections firmly, avoiding overtightening.
Testing & Finishing Touches
- Confirm all connections are secure, and hoses aren’t twisted.
- Slowly open shut-off valves; watch for leaks under the sink.
- Rotate faucet handle and sprayer, alternating hot and cold.
- Let water run 1–2 minutes to clear debris and air pockets.
- Make final adjustments and clean all surfaces.
Maintenance Tips & Longevity
- Every 3–6 months, clean aerators to prevent clogging.
- Use pH-neutral cleaners for safe finish cleaning (no bleach or abrasive pads).
- If dripping occurs, replace valve cartridge per manufacturer instructions.
- Keep the manual or purchase info handy for future part replacements.
Troubleshooting Common Issues
- Leaking from base or handle: Tighten mounting nut or replace internal O-ring.
- Low flow: Remove and clean aerator or check for supply shut-off issues.
- Sprayer not retracting: Check weight on sprayer hose or clean slide tube.
- Uneven spray pattern: Clean spout tip to remove calcium buildup.
When to Call an Oakville Plumber
- If pipes under the sink are corroded, leaky, or misaligned.
- If the sink’s deck finish is damaged or uneven.
- When you want to install a new waterline services, especially for filtered water or ice-makers—see our Oakville waterline services page.
- In emergencies like sudden bursts or water pressure failure, our 24-hour emergency plumbing team is ready to assist.
FAQs
- Can I upgrade my faucet without replacing plumbing lines?
Yes—most upgrades use the existing ½″ supply lines. If lines are damaged, replacement may be advised by a plumber. - Is it okay to install a deck-mount faucet on a counter with a soap dispenser hole?
Absolutely. A 3-hole setup can accommodate faucet, soap dispenser, and sprayer. - How long does a kitchen faucet last?
A well-maintained quality faucet lasts 10–15 years. Maintenance on seals and valves extends lifespan. - Are touchless faucets worth it?
Yes—especially for hygiene and convenience. They may require battery or electrical access—factor this into your install planning. - Can I putty around a dishwasher pull-down sprayer line?
Use silicone caulk instead of putty. Scrub gently with soapy water—the line can’t be weighted in place if blocked by rigid putty.
Final Thoughts
An upgraded kitchen faucet adds style, functionality, and long-term value to your home. With the right planning, tools, and step-by-step approach, many DIYers handle the job confidently. But if issues arise—or you seek a flawless, leak-free solution—our professional team in Oakville is ready, offering regular installations, waterline expertise, and 24-hour emergency plumbing support.
Ready to upgrade? Contact us today to schedule a consultation or professional installation service!
Related Services:
- Oakville Plumbers – General & Faucet Installations
- Waterline Services – Filter Ice‑Maker Installations
- 24‑Hour Emergency Plumbing Services
References
Here are high-authority external resources you can include in the blog to enhance credibility and trust:
- EPA WaterSense Program – Faucet Water Efficiency Standards
- Family Handyman – How to Replace a Kitchen Faucet
- Consumer Reports – Best Kitchen Faucets of the Year
- This Old House – Installing a Kitchen Faucet